Datamoshing is the process of manipulating the data of media files in order to achieve visual or auditory effects when the file is decoded. In some cases the term datamoshing is used perfect Replica Watches best quality to describe this process applied to any type of media file — I like to think it applies solely to video since it results in moving images being moshed together. Regardless of the application of the term, datamoshing videos can be done quite easily with free, cross-platform tools.
Modern compressed video files have very complex methods of reducing the amount of storage or bandwidth needed to display the video. To do this most formats don’t store the entire image for each frame.
Frames which store an entire picture are called I-frames (Intra-coded), and can be displayed without any additional information.
Frames which don’t contain the entire picture require information from other frames in order to be displayed, either previous or subsequent frames, these frames are called P-frames (Predicted) and B-frames (Bi-predictive). Instead of storing full pictures these P-frames and B-frames contain data describing only the differences in the picture from the preceding frame, and/or from the next frame, this data is much smaller compared to storing the entire picture — especially in videos where there isn’t much movement.
When a video is encoded, or compressed, a combination of these types of frames are used. In most cases this means many P-frames with I-frames interspersed at regular intervals and where drastic visual changes in the video occur. More information on frame types can be found here.
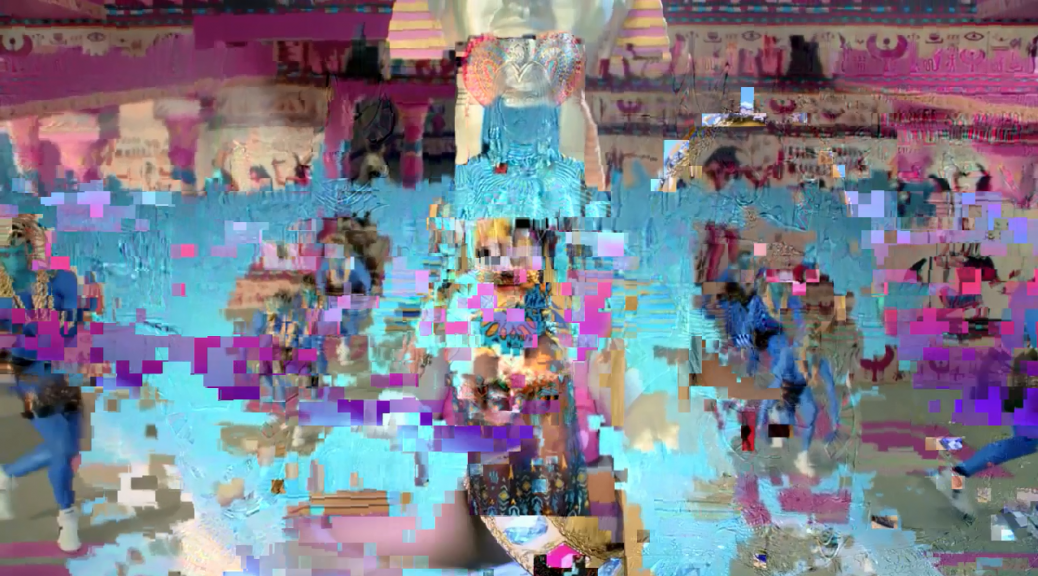
If an I-frame is corrupted, removed or replaced the data contained in the following P-frames is applied to the wrong picture. In the above video I-frames have been removed and so instead of scenes changing properly you see the motion from a new scene applied to a picture from a previous frame. This process of corrupting, removing or replacing I-frames is a very popular video datamoshing technique and what this tutorial will focus on.
Another video datamoshing technique involves selecting one or more P-frames and duplicating them multiple times consecutively. This results in the same P-frame data being applied to one picture over and over again, accentuating the movement and creating what’s known as a Bloom effect.
For this tutorial we’ll be using Avidemux, a free, cross platform video editing application. Generally the effects of datamoshing are viewed as errors, or undesirable and thus applications like Avidemux try their best to correct these errors and eliminate glitching distortion. For this reason the latest version of Avidemux isn’t very good for datamoshing, but some older versions, such as 2.5.6, available here, work just fine.
After downloading and installing Avidemux 2.5.6 Open the video you want to mosh.
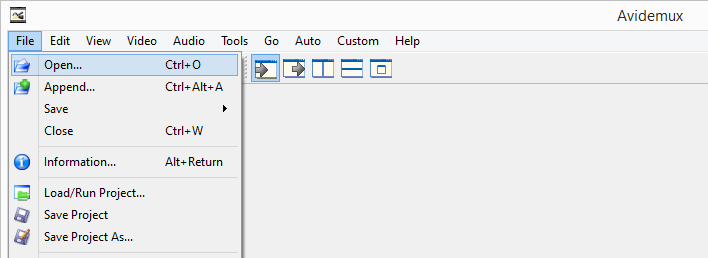
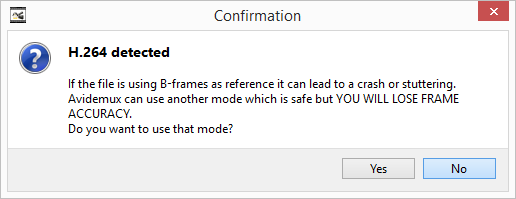
Avidemux may show warnings depending on the type of file you’re using, select No and continue.
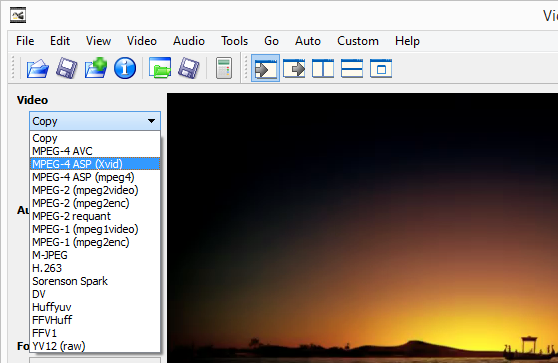
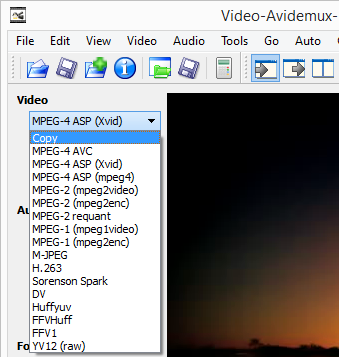
Once the video is loaded we’ll be making a small change to allow us to remove I-frames and still have a playable video. Under Video on the left side of the interface use the dropdown to change the selection from Copy to MPEG-4 ASP (Xvid).
Next click the Configure button below the Video dropdown on the left. Select the Frame tab and then change the Maximum I-frame Interval from 300 to 99999999 then click OK. By changing this setting we’re allowing the video file to be played back even if it has unusually few I-frames, one every 99999999 frames.

With this setting changed the video must be saved and then reloaded for it to take effect. Save the video with a new name to indicate that the Maximum I-frame Interval has been adjusted.

Open the new video, select No if Avidemux displays any warnings. Once opened, change the Video dropdown on the left side of the interface back to Copy. We won’t be changing the encoding or any settings of the video at this point, we’re just going to remove I-frames and then Save it.
To remove I-frames we use the slider at the bottom of the interface, it displays the current frame type below the video navigation buttons, you’ll mostly see Frame Type: I (00) and Frame Type: P (00). The first frame will most likely be an I-frame and should be left in so that the video can start properly. To locate other I-frames click on the slider tab/grip to focus the slider then press the Up Arrow on your keyboard to jump to the next I-frame, the Down Arrow will jump to the previous I-frame.
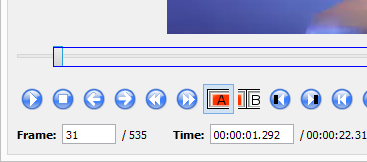
In order to remove an I-frame we must select it, this is done by marking an in point and an out point, these points are referred to as A and B in Avidemux and the frames of video between these two points are considered selected. Once you have found an I-frame click on the mark A button under the slider. You should see a blue border identify the new selection, starting at the slider grip and encompassing the remaining frames in the video.
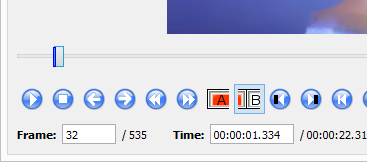
Pressing delete now would delete the current I-frame and all subsequent frames so we have to reduce the selection to only the I-frame. This is done be pressing the Right Arrow key to move to the next frame and then clicking the mark B button below the slider. The blue selection border should update to show only the I-frame selected as illustrated below.
Now that only a single I-frame is selected press the Delete key on your keyboard to remove it. To remove all the I-frames use the Up Arrow to move to the next one and repeat the removal process. Try to avoid moving backwards through the video once you’ve removed I-frames as this can cause Avidemux to crash, stick to moving forward through the I-frames and removing them.
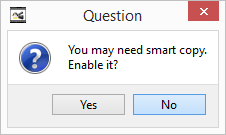
After you’ve removed one or more I-frames, Save the video and again select No if Avidemux prompts or warns you about something, smart copy for instance.
Once the video is saved open it up in your favorite player and evaluate the havoc you’ve wrought upon it.
The video included in this post was datamoshed using this technique, however the audio was slowed down using traditional video editing.#corruptabsolutely
Update
For those of you unable to run Avidemux 2.5.6 on OSX you can try running Avidemux 2.5.4 on Yosemite and Lion thanks to some instructions from Way over at Glichet.
- Go to the Avidemux 2.5.4 binary archive here
- Download avidemux2_2.5.4_intel.dmg
- Unpack it and then drag avidemux2 to your Applications folder
- Navigate to the Applications folder, right-click (or control+click) on avidemux2, and click Show Package Contents
- Delete libxml.2.dylib and libiconv.2.dylib from the Contents/Resources/lib folder. *libxml.2.dylib can also be named libxml2.2.dylib
- Open avidemux2
Windows
OSX
i keep saving the stuff but it saves as data files please help me
What exactly do you mean by data files? Have you tried renaming them to .AVI or .MP4? If you continue to have issues with this method, please post the details in the forums, they’re better suited for troubleshooting discussions.
http://datamoshing.com/forums/forum/video/
Even if it’s saved as a data file you can add the .avi extension in “Properties”.
Hope it will help.
hi, no idea why but i don’t hve the mpg-4 asp (xvid) in my version (Avidemux 2.5.6). Mac os x el capitan 10.11.6. searched for a codec pack but can’t find anything for mac. any help?
I’ll have to experiment on OSX to find an alternate codec that works.
Hi Phil, we have an urgent work with avidemux but the recent versions don’t function whith my mac, have you any solution for me please ??
Thank’s a lot
You can try a portable or older version of Avidemux available here,
http://www.videohelp.com/software/AviDemux/old-versions
Hey there! Just wondering where you got 2.5.6 for Mac from? Seems to be hard to find on the internet! Thanks!
Hey, so I get to the step where I switch it to (xvid) and then I save the new file. I re-open that file, but there are no I-Frames any longer. I can’t use the blue arrow to navigate around them, so I used the incremental blue arrows and it’s just a bunch of b’s and p’s.
Am I doing something wrong? I switched the max to 99999999 and saved it as a new file and then run into this roadblock.
Not sure what’s going on for you. Perhaps post in the forums with more detail. There are I-frames before saving as Xvid and absolutely non after?
I encountered the same issue, but setting the “Maximum consecutive B-frames” to zero in the Xvid Frame Configuration dialog before saving to xvid solved it.
Hi,
Nice tutorial, but I’m not able to proceed further…
My Avidemux doesn’t have vid. output – MPEG 4 ASP (xvid).
It only has MPEG4 ASP (xvid4) and that is completely different.
🙁
It makes datamoshing so hard.
What exact version of Avidemux and what operating system are you using?
is there any way to have zero quality loss when outputted? I notice that the datamoshed video has a slight green tint when editting it back into a project containing the original video footage.
The only thing that comes to mind is to use high quality input videos. Also I’ve noticed that some players will render a lot of green when there are errors and some will not (YouTube for instance renders a lot of grey rather than green for errors). Try Media Player Classic or VLC.
Yup not seeing the MPEG-4 ASP (Xvid) option under the copy tab, all that appears is MPEG-2 requant and YV12 (raw). Running on Windows 64-bit and downloaded the link posted above to Avidemux.
You could try downloading and installing the codec from here,
https://www.xvid.com/
Older AVIDEMUX files not work for newer Mac’s.
It seems as though we may need to find an older Mac that cannot be updated, just to do this single effect.
People loved my videos I did years ago and now I cannot replicate the process.
for older versions of avidemux (2.5.4) i found this:
http://forum.glitchet.com/t/tutorial-how-to-install-avidemux-for-datamoshing-on-mac-os-x/33
Thanks, I’ll put a note in the post regarding this.
Hi, it seems that with this version of Avidemux for Mac we must delete a file : Delete libxml.2.dylib and libiconv.2.dylib from the Contents/Resources/lib folder. How do you delete this file? I can’t put in in my trash.
Hello, I have encountered a problem after saving the clip with deleted I-frames, it’s sped up, like 4x faster.
Hi, thanks a lot for this tutorial, works fine.
I want to continue the editing in premiere pro cs6 but says the file i import its damaged, of course eheh
do you know how can i import it to premiere?
or maybe make premiere editing first and then use avidemux to corrupt the file – in this cause will it affect youtube upload? thanks again!
Ensure that the resulting file has the .avi extension. Avidemux lets you name files anything which can result in output files having the wrong extension causing issues with other software.
Hi , when i drag videos that i have exported from Final Cut pro i get a pop saying ‘No audio decoder found for this file. save (A+V) will generate bad AVI. Save audio will work”
what does this mean ? after clicking the video is just a green screen.
Sounds like whatever codec Final Cut is exporting isn’t supported. Try uploading the video to YouTube, wait for YouTube to process it and then in the YouTube Video Manager use the dropdown beside the video to download the MP4.
Hi Phil, could you help us out with a datamoshed image? the community at /r nomansskygame? we have an image which we’re trying to fix but we need help working out what was done to it. link to the image is here: https://s3.amazonaws.com/cdn.wakingtitan.com/data/s01-091d12cf-befd-4f85-8644-3a2e74d56a8a.jpg
thanks in advance!
Difficultylevel
Looks like JPEG corruption. You can see similar results here,
https://snorpey.github.io/jpg-glitch/
Though if it’s simply data loss, reversing the process entirely is impossible.
we’re thinking that the corruption is based upon a possible password or simple bit manipulation but it’s hard to work out, the joys of ARG’s. =)
Ah, well, if the corruption is engineered to be reversible, as in some sort of puzzle it’s less about glitching as it is solving the underlying riddle. Using a JPEG decoding library along with some programming, C#, Obj C, whatnot, you could perhaps see exactly where bad/manipulated bits are. Potentially there’s an application which would do this as well, ImageMagick Identify perhaps with debug and logging?
https://www.imagemagick.org/script/identify.php
Otherwise looking for patterns and outliers in a hex editor.
Thank you so much for this tutorial! I had never before tried datamoshing (I don’t know if that’s even a verb) and I’m really excited to play around with it!! Really, thnx!!!!
If a file does not have enough i frames, is there a way to go around this?
It would have to be re-encoded.
Could you elaborate a little more on this, please?
This is the exact problem I’m having and it’s producing pretty naff results ahahaa
The audio just stutters and it goes a bit pixelated.
Apologies for the n00b question.
He probably meant you have to save it as a proper video file again. Basically rename your file to *.mp4 and transcode it with your favorite, like VLC or Handbrake.
This process will add new I-frames, so you can start the whole proces again.
Took me a couple of hours but it worked, thank you very much.
Hi, im trying to do this with a video i made. Its multiple pictures so kind of in a sense a timelapse. When i try to do this process there are no i-frames. Similarly when i lower the i-frame interval, i get more i-frames showing, but when i delete them, the video doesent mosh. Is this due to the video being pictures in a way? Its been saved and exported as H.264 format.
Question, what about if you wanted the edited video to still have the same runtime as the original? The glitch doesnt seem to work when i paste the previous frame to the old iframe location
With new versions of Avidemux the process described in the article no longer works. There is no “frame” tab in the configure menu in my version (Win64 2.7)
Super easy. Instructions are right on. I’ve wanted to try some data-moshing since my instructor at the CSU turned me on to it a couple years ago. I was really impressed with how my one minute forty second clip of the movie “Event Horizon” turned out.
The data corruption aesthetic is sweet.
Digital television really sucks. I prefer VHF/UHF. But I would REALLY like to figure out what’s going on with the digital television antennae jankiness. Now THAT is just some fantastic signal corruption.
Thank you so much for this tutorial!
🙂
Great tutorial, this got me started just fine.
Do you think you could do a more detailed section on the other datamosh technique, creating blooms? Right now I’m just experimenting at random with sequences of repeated P frames